
How to create a basic cube animation in After Effects
I’m going to show you the steps it takes to make a basic cube animation. For this example, we’re going to make a cube slide in from the bottom, spin around, and then expand to fill the screen. This simple animation will teach you about setting up a project, adding shapes, and basic keyframe animation.
The download for the finished project file is at the end of the article!
Setting up the project
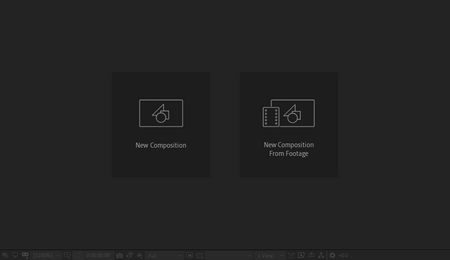
Let’s start by creating the project file. When you create a new project file you will be greeted by an empty canvas with 2 buttons. Start by clicking the New Composition button in the empty canvas.
A new window will pop-up with a bunch of settings for the composition. This may look overwhelming at first, but there are only 5 things we need to focus on: Name, Width, Height, Frame Rate, and Duration.
I’m going to name the composition “Simple Animation” but feel free to name it whatever you want. Make the width 1920px and height 1080px, change the Frame Rate to 60 frames per second, and make the duration 6 seconds. Then click OK.
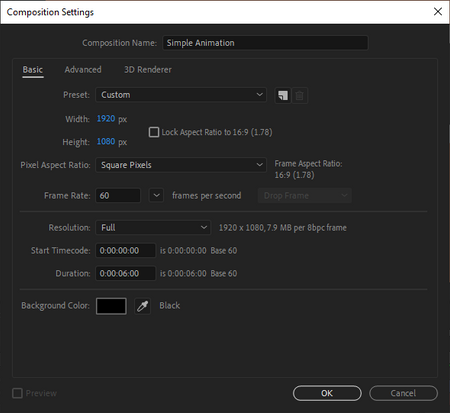
It should look something like this.
Adding objects
Now that we set up our project, we can add in the objects. Let’s start by adding in the background.
Go to the title bar at the very top of the window and go to Layer > New > Solid… You will see a new pop-up that looks very similar to the new composition screen. Let’s change the Color to orange (#DE885A). Then click OK.
Next, we’re going to create the cube. Look for the toolbar at the top of the window and select the Rectangle Tool. Change the Fill to white. Then click and drag anywhere on the canvas to create a cube. In order to create a perfect cube, hold down Shift+Ctrl (Shift+Cmd on Mac) on your keyboard to keep the cube proportionate.

Now that we created the cube, we need to center it on the canvas. Right-click on the cube and go to Transform > Center Anchor Point in Layer Content to center the anchor point. Then right-click again and do Transform > Center In View to center the cube.

Your composition should look like this.
Animating the cube
To animate the cube we need to create keyframes. Think of keyframes like destinations on a GPS. When you want to go somewhere, you set a starting position of where you are and your destination of where you want to go. Then the GPS will calculate how to take you there.
When you set a keyframe at frame 0, that’s like your starting position. Then when you create another keyframe on frame 60, that’s like your destination. When you play the animation, the computer will calculate what will happen in between the starting and destination keyframes.

We want the cube to slide from the bottom of the canvas. So let’s start with the position.
Make sure you’re at the beginning frame of your animation. Select the cube in your timeline and press ‘P’ on your keyboard to show the Position property. Click the stopwatch icon next to Position to create your first keyframe.
Next, go one second forward in the timeline and click the diamond icon in between the arrows to create your second keyframe.
Go back to the first frame and click and drag on the cube while holding ‘Shift’ to move the cube up and down in place. Then drag the cube below the canvas.

With the cube still selected, go to the 2-second mark in the timeline and press ‘R’ on your keyboard to show the Rotation property, then add a new keyframe. Go to the 3-second mark and change the rotation to “+180”. This will animate the cube to do a 180-degree spin.

Lastly, go to the 4-second mark and press ‘S’ on your keyboard to show the Scale property, then add a new keyframe. Go to the 5-second mark and click and drag the Scale property until the cube fills up the entire canvas.

The key animation is done! Press ‘U’ on the keyboard to see all your active keyframes, then press ‘Spacebar’ to preview the animation to make sure everything is correct.


Easing the animation
Now that we have the key animation completed. We’re going to use the Graph Editor to adjust the ease in and ease out of the keyframes to make the animation smooth.
Click and drag in the timeline to select all the keyframes, and Easy Ease them by pressing ‘F9’ on your keyboard. This will smooth out your animation.
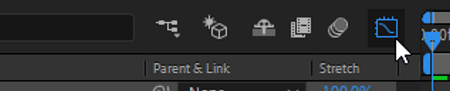
With the keyframes still selected, let’s go to the Graph Editor. Click the little graph icon next to the search bar and you will see the new graph view pop up in the timeline.
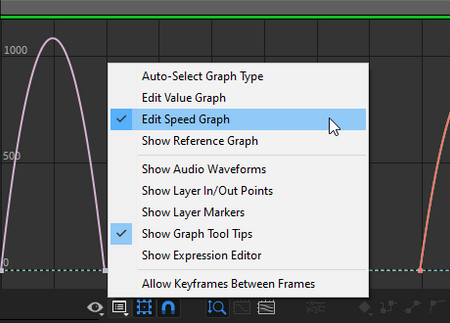
Next, right-click anywhere on the Graph Editor to change the view from Value Graph to Speed Graph.
Finally, click and drag the handles under the curves to adjust the easing of the keyframes. These curves represent the speed and velocity of the keyframes.
We’re going to make the Position slow down towards the end of the keyframes (Ease Out).
Then, make the Rotation start slow, then speed up, and then slow down again.
And lastly, make the Scale speed up towards the end of the keyframes (Ease In).
Make the graph look like this.
Done!
Congratulations! You did it! Preview the animation and be proud of your work!
